Here are lots of sewing machine needles to choose from. Insure a project’s success by selecting the right one.
by Lydia Morgan
Lay out an assortment of sewing-machine needles in various types and sizes on a table, and most of us can’t tell the difference among them. But put the wrong needle in your machine, or use the wrong needle for your fabric and/or thread, and all heck breaks loose. You can damage your bobbin hook. Throw off the machine’s timing. Get puckered seams. Break or shred thread. Punch holes in your fabric, and, at the very least, produce an inferior stitch. Whatever your machine, even the latest computerized model, needle selection can make or break your stitch.
At one time, only one type of machine needle was available to home sewers. The sole choice involved was size. But today, home sewers can choose from a wide variety of needle types in their quest for trouble free sewing .
Several things can determine the type of needle to pick. The fabric you’re using. The thread you’ve chosen (for example, metallic or embroidery). Or the type of stitch you plan (for instance, topstitching or hemstitching). When you’re doing regular, not decorative, sewing, the type of fabric determines the shape of the needle’s point. The fabric’s weight determines the needles’ size.
But before deciding on a needle, you first need to know the needle system your machine uses. Unlike commercial machines, which use a variety of needle systems, almost all home-sewing machines use a 130/705H needle system—designated on the needle case between the needle’s name and size (other letters indicate needle type, such as M for Microtex or Q for quilting). Your machine’s needle system never changes, regardless of the size or type of needle you use.
Tension control, stitch length, foot pressure, and other invisible settings on automatic machines are set for medium weight fabrics, threads, and needles. If you’re a middle of the road sewer, using midweight, woven fabrics, you could be happy using a size 12 universal needle for the rest of your life. But when you want improved stitch quality, learn which specific needles to use for various jobs. See "Anatomy of a needle" on p. 59 to understand the build of this tiny, but important tool.
Select needle type by the task at hand
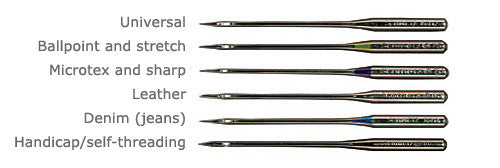
Sewing machine manufacturers want their machines to consistently produce a perfect stitch. So the needle’s configuration is engineered to manage thread and fabric to reduce the likelihood of skipped or flawed stitches. Each needle type produces a stitch by using a uniquely designed groove, scarf, eye, and/or point to enable the needle and bobbin hook to meet perfectly. The chart of needle types above describes their uses, configuration, and how to troubleshoot them.
Choose regular needle size by fabric weight
When selecting a needle for regular sewing, start with needle size. European needles range in size from 60 to 120, which refers to the diameter taken on the shaft right above the eye. American needles are sized from 8 to 19 in an arbitrary numbering system. They are paired with corresponding European sizes.Ffor example, 60/8 or 70/10; the larger the number, the larger the needle.
Determine needle size by fabric weight. Choose a size 60/8 needle for lightweight fabrics similar to georgette or organdy. A 70/10 or 80/12 needle for medium-weight jersey, Lycra, linen, or calf leather; a 90/14 and 100/16 for heavy fabrics like jeans, vinyl, upholstery or canvas. A 110/18 or 120/19 for very heavy fabrics. After choosing needle size, match the needle point to your fabric. The needle type and name is usually determined by the characteristics of the needle’s point.
Thread should pass easily through eye of needle
How smoothly the thread pulls though the needle’s eye is also a factor in producing even, regular stitches. So if you have trouble threading the needle and problems with the stitches, the thread and needle aren’t matched correctly. Lay your thread in the needle’s front groove. It should "snuggle" in.
In the end, most sewers just want to get professional looking results. Knowing more about needles brings you closer to that goal. Needle choice greatly affects your outcome. For every correctly chosen, new needle you put into your machine, you should have eight to 12 continuous hours of trouble-free sewing.
Anatomy of a Needle
The key features of a standard machine needle are called out below. Their configuration varies from needle type to type (see the chart on pp. 60-61).
Shank
Top of needle that inserts into machine; most often has round front and flat back, which seats needle in right position.
Shaft
Body of needle below shank. Shaft thickness determines needle size.
Front groove
Slit above needle eye, should be large enough to "cradle" thread for smooth stitches.
Point
Needle tip that penetrates fabric to pass thread to bobbin-hook and form stitch. Shape of point varies among needle types.
Scarf
Indentation at back of needle. A long scarf helps eliminate skipped stitches by allowing bobbin hook to loop thread more easily. A shorter scarf requires a more perfectly timed machine.
Eye
Hole in end of needle through which thread passes. Needle size and type determine size and shape of eye.
How is a stitch formed?
The formation of a stitch begins when the needle penetrates the fabric and descends to its lowest point.
The bobbin hook then slides by the needle’s scarf, catching the upper thread, and carries it around the bobbin and bobbin thread.
The thread is then pulled up into the fabric, completing the stitch.
Standard Needles
The configuration of these needles is based on the particular fabric to be sewn.
Uses: Safest needle choice for most fabrics.
Configuration: Has slightly rounded point and elongated scarf to enable almost foolproof meeting of needle and bobbin hook.
Troubleshooting: When fabric is not medium-weight woven, consider needle specifically suited to fabric. For example, size 18 universal needle works on heavy denim, but size 18 jeans needle works better.
Uses: Ballpoint needle for heavier, looser sweater knits; stretch needle for highly elastic fabrics, like Spandex, or Lycra.
Configuration: Both have rounded points that penetrate between fabric threads rather than pierce them. (Stretch-needle point is slightly less rounded than ballpoint.)
Troubleshooting: Test-stitch knits with ballpoint, stretch, and universal needles to see which doesn’t cut yarn and yields best results. If ballpoint skips stitches, try stretch needle.
Uses: Sewing microfiber, silk, synthetic leather; precisely stitching edges; and heirloom sewing.
Configuration: Has an acute point.
Troubleshooting: Essentially trouble-free, but fabric may require a Teflon, roller, or even/dual-feed presser foot.
Uses: Excellent for sewing natural leather.
Configuration: Has slight cutting point (almost like an arrowhead).
Troubleshooting: On synthetic leather, unless it’s very heavy synthetic, cuts rather than pierces stitch hole and can tear leather. Most synthetic leathers require Microtex or sharp needle.
Uses: For heavyweight denim, duck, canvas, upholstery fabrics, artificial leather, and vinyl.
Configuration: Has deeper scarf, acute point, and modified shaft to sew without pushing fabric down into needle-plate hole. Goes through fabric and meets bobbin hook better on dense woven fabrics.
Troubleshooting: If stitches skip when sewing very heavy fabrics, try larger needle and sew more slowly or walk needle through fabric (by turning hand crank).
Handicap/self-threading needle
Uses: Enables easier threading for sewers with vision problems.
Configuration: Universal needle with slip-in threading slot at the eye.
Troubleshooting: Always pull sewn piece back away from needle before cutting thread so needle doesn’t unthread. Needle works well on woven fabrics, but may occasionally snag knits, so test-sew to check for fabric and needle compatibility.
Decorative Needles
The configuration is designed to wed thread to fabric for surface embellishment.
Uses: Topstitching.
Configuration: Has extra-acute point, extra-large eye, and large groove for heavy thread.
Troubleshooting: Use smallest size sewing machine needle that accommodates your thread to avoid punching large holes in fabric.
Uses: Machine embroidering or embellishing with decorative thread.
Configuration: Has light point (neither sharp nor ballpoint) and enlarged eye to keep
decorative threads from shredding or breaking, and prevent skipped stitches.
Troubleshooting: If thread still shreds on dense or heavily stitched design, use larger size needle or Metallica needle.
Metallic (Metafil and Metallica) needle
Uses: Sewing with decorative metallic threads.
Configuration: Has universal or standard point; large, elongated eye; and large groove to allow fragile metallic and synthetic filament threads to flow smoothly.
Troubleshooting: Metallic threads are very sensitive to problems in machine: Tiniest burr on thread path or needle can cause problems.
Uses: Piecing, quilting, and stippling.
Configuration: Has special tapered shaft to prevent damaging fabrics when stitching multiple layers.
Troubleshooting: Move fabric smoothly without pulling on needle when free-motion stitching to prevent breaking needle.
Special-purpose needles
These sewing machine needles are used only with front to back threading machines with zigzag features. Make sure your throat plate needle hole is wide enough to accommodate needle’s width. The zigzag width function is set at zero to prevent sideways movement.
Uses: Hemstitching or heirloom embroidery on linen and batiste.
Configuration: Has fins on sides of shank to create holes as you sew.
Troubleshooting: Stitch is more effective when needle returns to same needle hole more than once. If needle pushes fabric into needle hole, put stabilizer under fabric.
Uses: Topstitching, pin tucking, and decorative stitching.
Configuration: Two needles on single shaft produce two rows of stitches. Measurement between needles ranges from 1.6mm to 6mm. Needles come with universal, stretch, embroidery, denim, and Metallica points.
Troubleshooting: Be sure throat plate allows for distance between needles.
Uses: Same uses as for double needle.
Configuration: Cross bar on single shaft connects three needles to sew three stitching
rows. Comes with universal point in 2.5mm and 3mm widths.
Troubleshooting: Same as for double needle.
Uses: Free-motion stitching with dropped feed dogs.
Configuration: Has wire spring above point to prevent fabrics from riding up onto needle,
eliminating need for presser foot.
Troubleshooting: Before using, practice free-motion stitching with heavy regular sewing machine needle, paper, and dropped feed dogs. Don’t pull paper/fabric; instead gently guide it through stitching
To see the Pictures that Accompanied this Article, Click on Threads Pictures.
Comments